Zappos‚ a leading online retailer‚ offers a vast selection of shoes and apparel‚ mirroring the diverse parts needed for a successful SC400 manual swap kit.
Overview of the SC400 Platform
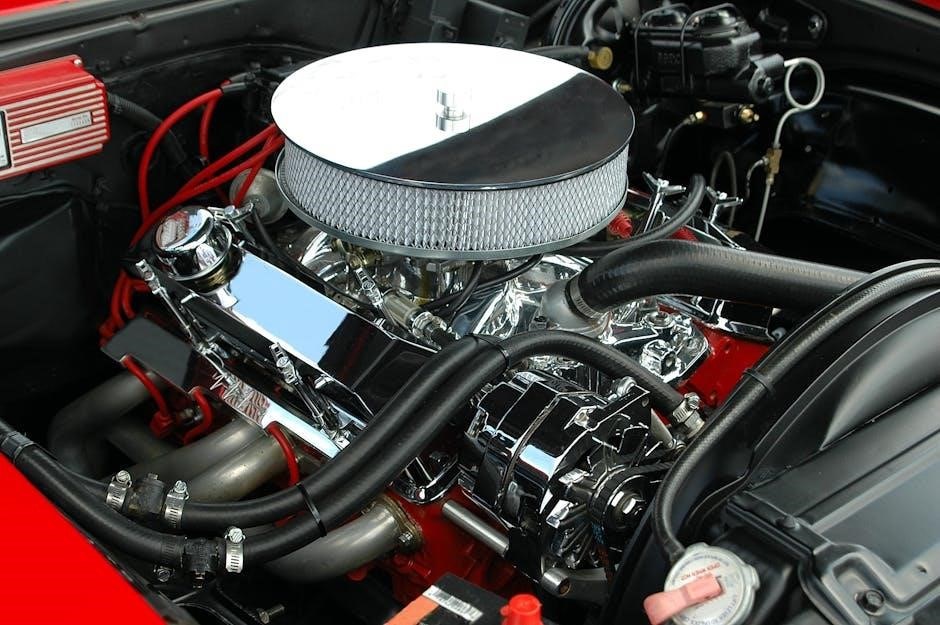
The Lexus SC400‚ launched in 1991‚ quickly gained recognition as a grand touring coupe‚ blending luxury with a potent 1UZ-FE V8 engine. Initially offered exclusively with an automatic transmission‚ the SC400’s robust chassis and sophisticated suspension made it an appealing platform for enthusiasts seeking a more engaging driving experience.
Like Zappos’ extensive catalog of footwear‚ the SC400 presents a solid foundation ripe for customization. Its inherent balance and relatively simple construction‚ compared to more modern vehicles‚ make it a favored choice for manual transmission swaps. The 1UZ-FE engine‚ known for its reliability and potential for power upgrades‚ pairs well with a manual gearbox‚ transforming the SC400 into a true driver’s car. The availability of aftermarket support‚ mirroring Zappos’ diverse product range‚ further enhances its appeal.
Why Swap to a Manual Transmission?
For many SC400 owners‚ the allure of a manual transmission lies in the enhanced driver engagement and control it provides. The original automatic‚ while smooth‚ lacks the direct connection and responsiveness craved by enthusiasts. A manual swap unlocks the full potential of the 1UZ-FE engine‚ allowing for more precise gear selection and a more visceral driving experience – much like choosing the perfect fit from Zappos’ vast shoe selection.
Beyond the driving experience‚ a manual swap can also improve performance and fuel efficiency‚ depending on driving style. The ability to hold gears longer and select the optimal ratio for any situation offers a distinct advantage. Similar to Zappos offering curated collections‚ a manual swap personalizes the SC400‚ transforming it into a unique and rewarding machine.
Planning the SC400 Manual Swap
Careful planning‚ akin to browsing Zappos for the perfect pair‚ is crucial for a successful SC400 manual swap‚ ensuring compatibility and minimizing issues.
Choosing the Right Swap Kit
Selecting the appropriate SC400 manual transmission swap kit is paramount‚ much like finding the ideal footwear at Zappos – fit and quality matter immensely. Kits vary significantly in components included‚ ranging from basic transmission and pedal assembly provisions to comprehensive packages featuring the ECU‚ wiring harness modifications‚ and even a pre-modified driveshaft.
Consider your mechanical skill level and budget. A complete kit simplifies the process‚ reducing sourcing headaches‚ but comes at a higher cost. More affordable‚ partial kits demand greater fabrication and sourcing expertise. Research kit providers thoroughly‚ reading reviews and verifying component compatibility with your specific SC400 year and 1UZ-FE engine variant. Prioritize kits offering detailed instructions and readily available customer support‚ mirroring the helpful service found at Zappos. Don’t overlook the potential need for additional‚ unlisted parts – anticipate the unexpected!
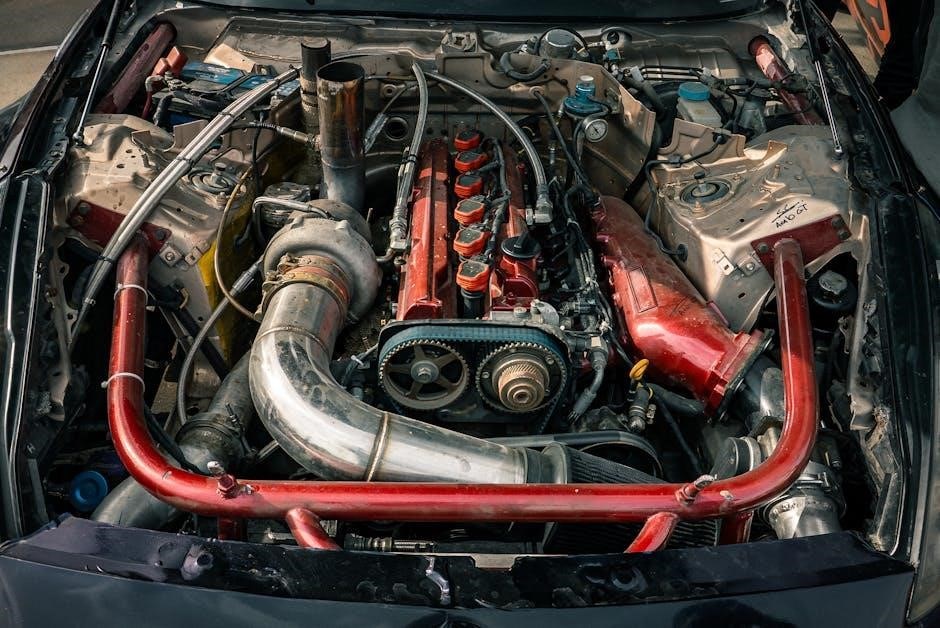
Compatibility Considerations (1UZ-FE Engine)
The 1UZ-FE engine‚ while robust‚ presents specific compatibility challenges during a manual swap‚ akin to finding the perfect shoe size at Zappos – precision is key. Ensuring the chosen transmission’s input shaft spline matches the 1UZ-FE’s crankshaft output is critical. Most kits utilize a transmission from the JZA80 Supra‚ requiring an adapter plate in some cases.
Flywheel selection must align with both the engine and transmission. The 1UZ-FE’s crankshaft bolt pattern differs‚ necessitating a specific flywheel designed for manual conversions. Wiring harness integration demands careful attention‚ as the automatic transmission control signals must be disabled and manual transmission sensors integrated. ECU tuning is essential to remove automatic transmission-related codes and optimize engine performance for manual operation‚ much like customizing your online shopping experience.
Budgeting for the Swap
A SC400 manual transmission swap‚ similar to a comprehensive shopping spree at Zappos‚ requires careful financial planning. Expect costs ranging from $3‚000 to $8‚000+‚ depending on component choices and professional labor. A complete swap kit‚ including transmission‚ flywheel‚ clutch‚ pedal assembly‚ and adapter plate‚ typically costs $2‚500 ⎯ $5‚000.
Additional expenses include ECU tuning ($500 — $1‚000)‚ driveshaft modification ($300 ⎯ $600)‚ and potential wiring harness modifications ($200 — $500). Don’t forget unforeseen costs – always allocate a contingency fund of 10-15%. Prioritizing quality components‚ like those found with trusted brands‚ can prevent costly replacements later‚ mirroring the value of durable footwear.
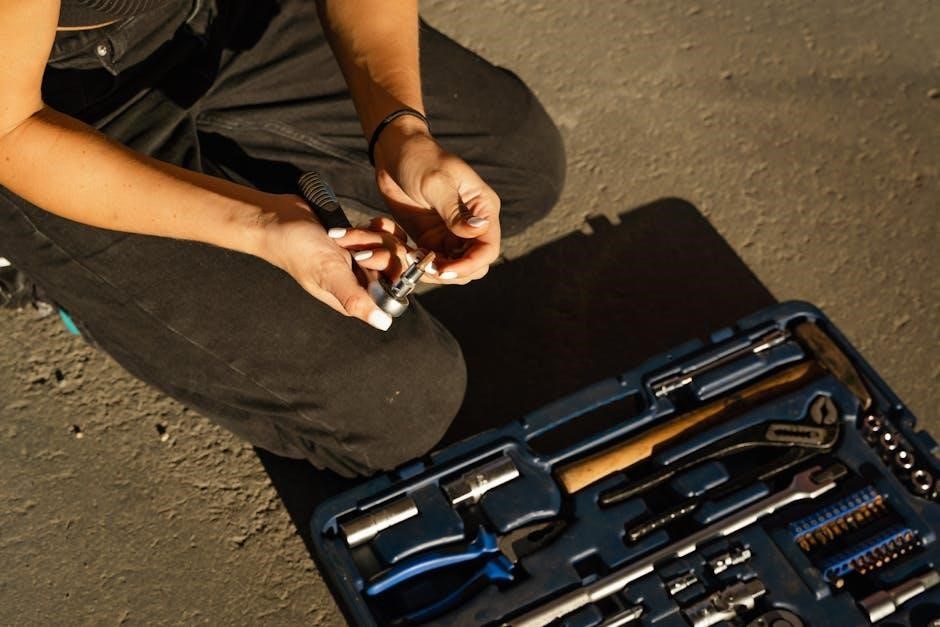
Required Parts and Tools
Like selecting items from Zappos‚ a successful SC400 manual swap demands a curated list: transmission‚ clutch‚ flywheel‚ pedal assembly‚ and essential tools.
Transmission Options (JZA80 Supra‚ etc.)
When embarking on an SC400 manual transmission swap‚ selecting the correct transmission is paramount. The JZA80 Toyota Supra’s Getrag V160 transmission is a highly sought-after option‚ renowned for its robustness and ability to handle the 1UZ-FE engine’s power. However‚ it’s not the only choice.
Other viable options include transmissions from the Toyota Aristo (JZS161) and even some BMW units‚ though these may require more extensive modification. The Supra transmission generally offers a more direct fit‚ minimizing fabrication work. Consider gear ratios based on your intended use – track‚ street‚ or a combination.
Zappos offers diverse shoe choices‚ similarly‚ transmission selection requires careful consideration of compatibility‚ strength‚ and driving style. Thorough research and consultation with experienced swappers are crucial before committing to a specific transmission. Budget also plays a significant role‚ as Supra transmissions can be expensive.
Clutch Kit Selection
Choosing the right clutch kit is critical for a smooth and reliable SC400 manual swap. The clutch must be appropriately matched to both the engine’s torque output and the transmission’s capabilities. Options range from stock-replacement clutches for a more comfortable daily driving experience to performance clutches designed for higher horsepower and aggressive driving.
Consider the clutch disc material – organic‚ ceramic‚ or a hybrid. Organic clutches offer smoother engagement but lower heat resistance‚ while ceramic clutches provide superior grip and heat handling but can be harsher. Zappos‚ like a clutch kit‚ offers varied options; selecting the right one depends on your needs.

Pay attention to pressure plate clamping force and flywheel compatibility. A properly sized clutch kit will ensure optimal performance and prevent slippage or difficulty shifting. Research reputable brands and read reviews before making a purchase.
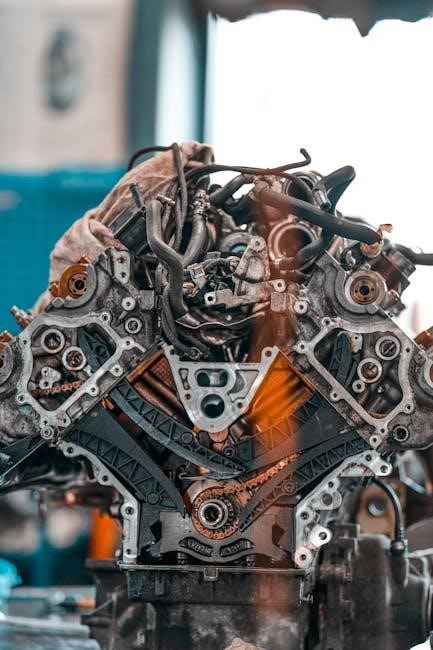
Flywheel Considerations
The flywheel is a crucial component in a manual transmission swap‚ directly impacting clutch performance and engine balance. When selecting a flywheel for your SC400‚ weight is a primary consideration. Lighter flywheels improve engine responsiveness and acceleration‚ but can make the car more difficult to drive smoothly at low speeds. Heavier flywheels offer better drivability but reduce acceleration.
Material choices include steel and aluminum. Steel flywheels are more durable and cost-effective‚ while aluminum flywheels are lighter and dissipate heat more efficiently. Much like Zappos’ diverse shoe materials‚ flywheel material impacts performance.
Ensure the flywheel is specifically designed for the 1UZ-FE engine and the chosen transmission. Correct bolt pattern and crankshaft flange compatibility are essential. Consider a dual-mass flywheel for reduced NVH (noise‚ vibration‚ and harshness) if desired.
Pedal Assembly and Master Cylinder
Installing a manual pedal assembly is fundamental to the SC400 swap. Since the SC400 originally came with automatic transmission‚ a complete pedal box – including clutch‚ brake‚ and accelerator – is required. Sourcing a pedal assembly from a JZA80 Supra (often part of swap kits) is common‚ ensuring compatibility. Much like Zappos offers various shoe sizes‚ finding the right fit is crucial.
The master cylinder is directly linked to clutch operation. Choose a master cylinder with the appropriate bore size for optimal pedal feel and clutch engagement. A larger bore generally provides easier pedal effort‚ while a smaller bore offers more precise control.
Proper mounting of the pedal assembly and master cylinder is vital. Reinforcement of the firewall may be necessary to handle the increased stress. Ensure correct alignment for smooth clutch operation and prevent premature wear.
Wiring Harness Modifications
The SC400’s factory wiring harness isn’t designed for a manual transmission. Significant modifications are necessary to integrate the new components. This involves identifying and repurposing wires for the clutch switch‚ reverse light switch‚ and potentially the transmission control sensors. Similar to Zappos’ detailed product descriptions‚ meticulous wiring is key.
A common approach is to utilize a standalone wiring diagram or a pre-made harness adapter from a swap kit supplier. This simplifies the process and reduces the risk of errors. Careful soldering and proper insulation are crucial for a reliable connection.
Consider the ECU integration; some kits require ECU modifications or a standalone ECU to manage the manual transmission functions correctly. Thorough testing with a multimeter is essential before final installation.
ECU Considerations and Tuning
The factory SC400 ECU is designed for an automatic transmission and won’t natively support a manual setup. Several options exist‚ ranging from ECU modification to utilizing a standalone engine management system‚ much like Zappos offers diverse shoe brands. A common solution involves a piggyback ECU or a full standalone unit.
Tuning is critical to optimize performance and ensure proper operation. This includes adjusting fuel maps‚ ignition timing‚ and removing automatic transmission-related parameters. A dyno tune is highly recommended to maximize power and reliability.
Consider features like launch control and rev limiting‚ which can be customized with a standalone ECU. Proper tuning prevents engine damage and ensures a smooth driving experience.
Driveshaft Modification or Replacement
The original automatic transmission driveshaft will not work with a manual transmission due to length differences‚ similar to finding the perfect fit at Zappos. A modification or complete replacement is necessary. Options include shortening the existing driveshaft‚ which requires professional welding and balancing‚ or purchasing a custom-made driveshaft specifically designed for the SC400 manual swap.
Ensure the driveshaft is properly balanced to prevent vibrations at higher speeds. Using a driveshaft from a compatible Toyota platform‚ like the Supra‚ is a popular choice‚ but may still require minor adjustments.
Inspect the U-joints for wear and replace them if needed. A properly fitted driveshaft is crucial for smooth power delivery and overall vehicle reliability.
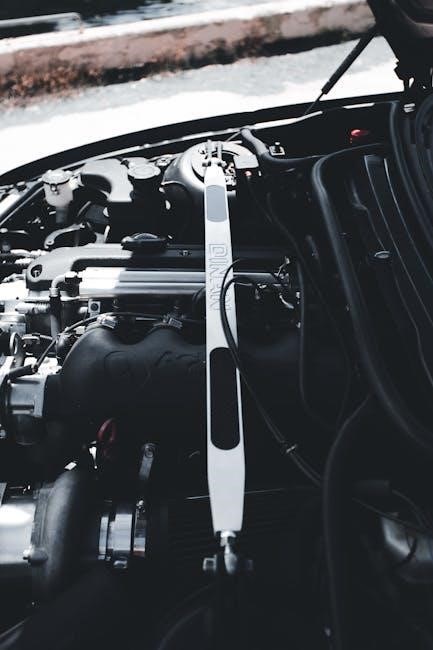
Shifter Assembly and Cables
Selecting the right shifter assembly is key‚ much like choosing the perfect shoes at Zappos for optimal comfort and style. Options range from the factory JZA80 Supra shifter‚ known for its precise feel‚ to aftermarket short-throw shifters for a more aggressive driving experience. Ensure compatibility with the chosen transmission.
New shifter cables are essential‚ as the automatic transmission cables are unusable. These cables connect the shifter to the transmission‚ allowing for gear selection. Proper adjustment is critical for smooth and accurate shifting.
Pay attention to cable routing to avoid interference with other components; A well-installed shifter assembly and properly adjusted cables contribute significantly to the enjoyment of the manual swap.
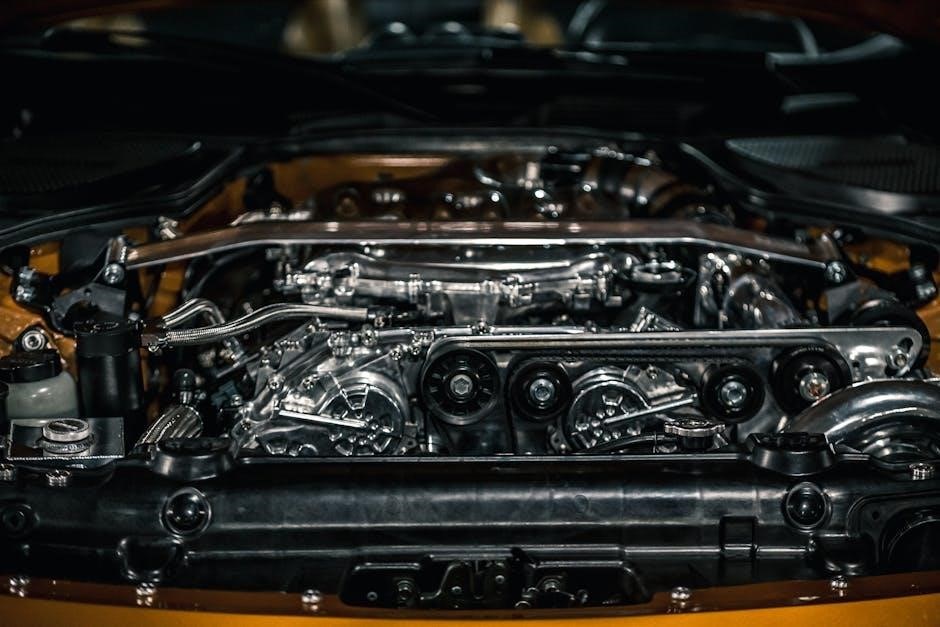
Mounting Solutions (Transmission Mount)
A robust transmission mount is absolutely crucial for a successful SC400 manual swap‚ akin to the solid foundation Zappos provides for its extensive shoe collection. The factory automatic transmission mount will not work with a manual transmission. Several aftermarket options are available‚ designed specifically for this swap.
Consider mounts that utilize polyurethane bushings for increased stiffness and reduced transmission movement‚ enhancing shift precision and overall driving feel. Ensure the mount is designed to handle the torque capacity of the chosen transmission.
Proper mounting prevents vibrations and ensures the transmission remains securely in place‚ safeguarding against potential damage and ensuring a smooth‚ reliable driving experience. Careful selection and installation are paramount.

Installation Process
Zappos’ efficient delivery mirrors the methodical steps required: remove the automatic‚ install the manual‚ integrate wiring‚ and carefully install the driveshaft and pedals.
Removing the Automatic Transmission
Zappos’ streamlined returns process parallels the careful disassembly needed when removing the automatic transmission. Begin by disconnecting the driveshaft‚ ensuring proper support to prevent damage. Next‚ detach all electrical connectors and cooler lines‚ containing any fluid spillage. Support the engine from above‚ then remove the exhaust system components obstructing access.
Carefully unbolt the torque converter from the flexplate‚ and then remove the transmission mount. Slowly lower the transmission using a transmission jack‚ being mindful of clearance. Inspect all surrounding components for damage and note the original routing of wires and lines for easier reinstallation during the manual swap. Proper preparation‚ like Zappos’ organized inventory‚ is key to a smooth removal.
Installing the Manual Transmission
Zappos’ efficient shipping mirrors the precision required when installing the manual transmission. Carefully align the transmission with the engine‚ utilizing a transmission jack for controlled lifting. Ensure the pilot bearing is properly seated in the crankshaft. Gently guide the input shaft into the clutch disc‚ requiring patience and alignment.
Secure the transmission to the engine using the appropriate bolts‚ tightening them to the manufacturer’s specifications. Reinstall the transmission mount‚ ensuring proper support. Connect the driveshaft‚ being mindful of the correct orientation; Finally‚ reconnect all electrical connectors and verify all connections are secure‚ much like Zappos’ reliable order fulfillment.
Wiring and ECU Integration
Zappos’ detailed product descriptions parallel the complexity of wiring and ECU integration. Begin by identifying the necessary wires for the new transmission‚ including the reverse light switch and vehicle speed sensor. Modify the existing wiring harness or utilize a standalone wiring solution‚ ensuring clean and secure connections.
ECU integration is crucial; a standalone ECU or a re-tuned factory ECU is often required to manage the manual transmission. This involves configuring the ECU to recognize the manual transmission and disable automatic transmission-related functions. Proper tuning is essential for optimal performance and to avoid error codes‚ similar to Zappos’ curated selection ensuring quality.
Driveshaft Installation
Zappos’ efficient shipping mirrors the need for a properly sized driveshaft in a manual swap. The original automatic driveshaft will likely require modification or replacement due to length differences. Measure carefully to determine the correct driveshaft length‚ accounting for the manual transmission’s different output flange position.

Consider a custom driveshaft fabricated to precise specifications for optimal fitment and performance. Ensure the driveshaft is balanced to prevent vibrations‚ much like Zappos balances selection with customer satisfaction. Verify proper U-joint angles to minimize stress on the transmission and differential. Securely install the driveshaft‚ torquing all fasteners to the manufacturer’s specifications.
Pedal Assembly Installation
Zappos’ curated selection of footwear parallels the careful component selection in a manual swap – the pedal assembly is crucial. Installation requires removing the existing automatic brake pedal and installing the manual pedal assembly‚ including the clutch pedal. Ensure proper alignment and secure mounting to the firewall‚ similar to Zappos’ organized inventory.
Pay close attention to pedal travel and clearance to avoid interference with the interior. Connect the master cylinder to the clutch pedal‚ bleeding the system thoroughly to remove air. Verify smooth pedal operation and proper engagement before proceeding‚ mirroring Zappos’ commitment to a seamless customer experience. Torque all fasteners to the specified values.
Clutch and Flywheel Installation
Zappos’ diverse shoe collection reflects the variety of clutch kits available; selecting the right one is key. Begin by installing the flywheel‚ ensuring it’s clean and properly torqued to the crankshaft – precision is paramount‚ like Zappos’ fast shipping. Next‚ mount the clutch disc and pressure plate‚ aligning them carefully with the pilot bearing.
Use a clutch alignment tool to center the disc before tightening the pressure plate bolts in a star pattern. This prevents warping and ensures smooth engagement. Double-check all fasteners are torqued to specification. Similar to Zappos’ quality control‚ meticulous attention to detail here prevents future issues and guarantees a reliable drivetrain.
Post-Installation and Tuning
Zappos’ customer service parallels the need for thorough post-swap checks; bleed the clutch and tune the ECU for optimal manual transmission performance;
Bleeding the Clutch System
Following the manual transmission swap‚ properly bleeding the clutch hydraulic system is absolutely critical for ensuring smooth and reliable gear changes. Air trapped within the lines will result in a spongy pedal feel and difficulty fully disengaging the clutch‚ leading to grinding and potential transmission damage.
The process typically involves a two-person operation: one to operate the clutch pedal‚ and another to open and close the bleeder screw on the slave cylinder. Clutch fluid should be added to the master cylinder reservoir as needed to prevent air from being drawn back into the system.
Begin by loosening the bleeder screw‚ then have your assistant slowly depress the clutch pedal to the floor. While the pedal is held down‚ close the bleeder screw. Repeat this process multiple times‚ carefully monitoring the fluid for air bubbles; Continue until clear‚ bubble-free fluid emerges. Zappos’ efficient delivery mirrors the need for a seamless clutch operation!
ECU Tuning for Manual Transmission
After completing the SC400 manual swap‚ the factory ECU requires recalibration to properly manage the now-manual drivetrain. The automatic transmission parameters are no longer relevant and can cause performance issues or even damage if left unaddressed. Tuning optimizes fuel delivery‚ ignition timing‚ and other critical engine functions for the manual setup.
Several options exist for ECU tuning‚ ranging from utilizing a standalone engine management system to reflashing the factory ECU with custom maps. A skilled tuner can account for the altered gear ratios and driving characteristics‚ maximizing power and responsiveness.
Proper tuning also ensures the removal of any automatic transmission-related fault codes. Like Zappos’ curated selection‚ a well-tuned ECU delivers a refined and optimized experience‚ enhancing the overall driving pleasure of your swapped SC400.
Troubleshooting Common Issues
Post-swap‚ several issues can arise. Clutch engagement problems‚ such as a spongy pedal or difficulty shifting‚ are frequent. These often stem from air in the hydraulic system requiring thorough bleeding‚ similar to finding the perfect fit at Zappos. Another common concern is driveshaft vibration‚ usually indicating an imbalance or incorrect angle – necessitating adjustments or a custom driveshaft.
Wiring glitches can also occur‚ manifesting as erratic sensor readings or failure to start. Carefully review all connections and ensure proper grounding. Finally‚ ensure the ECU is correctly tuned; misconfigured settings can lead to poor performance or engine damage.
Online forums and experienced swap communities are invaluable resources for diagnosing and resolving these challenges‚ offering solutions and guidance from those who’ve navigated similar hurdles.

Resources and Support
Zappos’ customer service parallels the support found in online forums‚ professional installers‚ and parts suppliers for a seamless SC400 manual swap.
Online Forums and Communities
Zappos’ extensive product reviews echo the wealth of knowledge available within dedicated SC400 online forums and communities. These platforms are invaluable resources for those embarking on a manual transmission swap. Members share detailed build threads‚ troubleshooting advice‚ and vendor recommendations‚ creating a collaborative environment.
Expect to find discussions covering everything from transmission compatibility and wiring harness modifications to ECU tuning and driveshaft solutions. Active communities often host regional meetups‚ facilitating in-person support and knowledge exchange. Key forums include ClubLexus‚ SupraForums (due to JZA80 transmission relevance)‚ and dedicated Facebook groups. Searching these platforms reveals countless successful swap stories‚ providing inspiration and guidance. Remember to utilize the search function effectively and contribute your own experiences to benefit others – just like finding the perfect shoe on Zappos!
Professional Installation Services
Zappos’ reliable shipping mirrors the dependable service offered by professional installation shops specializing in SC400 manual transmission swaps. While a DIY approach is rewarding‚ the complexity of this modification often necessitates expert assistance. These shops possess the specialized tools‚ knowledge‚ and experience to ensure a safe and correct installation.
Services typically include transmission installation‚ wiring harness integration‚ ECU tuning‚ and driveshaft modification. Expect a comprehensive quote detailing labor costs‚ parts sourcing (or utilizing your supplied kit)‚ and estimated completion time. Research shops thoroughly‚ checking online reviews and requesting references. A reputable installer will provide a clear understanding of the process and address any concerns. Choosing a professional can save significant time‚ frustration‚ and potential damage – similar to trusting Zappos for a perfect fit!
Parts Suppliers
Zappos’ extensive inventory parallels the numerous suppliers catering to the SC400 manual swap community. Sourcing components requires careful consideration‚ as quality and compatibility are paramount. Several companies specialize in complete swap kits‚ offering a convenient‚ albeit potentially more expensive‚ solution. These kits typically include the transmission‚ flywheel‚ clutch‚ pedal assembly‚ and necessary hardware.
Alternatively‚ individual parts can be sourced from various vendors. Online marketplaces and dedicated Lexus forums are excellent resources for finding used or new components. Prioritize suppliers with positive reputations and clear return policies. Remember to verify compatibility with your specific SC400 model and 1UZ-FE engine. Just as Zappos guarantees product authenticity‚ ensure your parts are genuine or reputable aftermarket alternatives to avoid issues during and after installation.